CLI & scriptsCLI 与脚本
Not a name list — every open-source script below has the full command path: flags, what it touches, and how to undo.不是名单 —— 下面每个开源脚本都写出完整操作路径:参数、会动什么、怎么撤回。
Run everything from the kit directory after cd hekouwang-terminal-kit. Shared flags: --lang en|zh (remembered). Prefer --dry-run / --check before the first real run.进入套件目录后再跑:cd hekouwang-terminal-kit。共用参数:--lang en|zh(会记住)。第一次真跑前优先 --dry-run / --check。
install · migrate · theme · node-mgr · doctor · uninstall · update · sync · setup-gui · unlock · paid · semantic
install.sh free
One-shot install. Idempotent — safe to re-run; skips what is already there. Backs up ~/.zshrc into ~/.hekouwang-terminal-backups/ before overwrite.一键安装。幂等 —— 重复执行安全,已装的跳过。覆盖 ~/.zshrc 前会备份进 ~/.hekouwang-terminal-backups/。
# 1) Preview — lists files and settings; changes nothing1) 预演 —— 列出要动的文件与设置,一个字节都不改
$ ./install.sh --dry-run

# 2) Install2) 安装
$ ./install.sh

# 3) Optional: pin language / Node manager (remembered)3) 可选:钉住语言 / Node 管理器(会记住)
$ ./install.sh --lang zh
$ ./install.sh --node fnm          # fnm | nvm | brew | vfox

# 4) China network: TUNA mirrors end-to-end4) 国内网络:全程清华等镜像
$ CN=1 ./install.sh
~/.zshrc? Run ./migrate.sh first — it moves your aliases / PATH into ~/.zshrc.local instead of wiping them.已经有用了很久的 ~/.zshrc?先跑 ./migrate.sh —— 把 alias / PATH 搬进 ~/.zshrc.local,而不是直接盖掉。
Changed your mind: ./uninstall.sh. Narrative guide: Install.后悔了:./uninstall.sh。叙事指南:安装。
migrate.sh free
Adopt an existing ~/.zshrc instead of overwriting it. Picks out lines that are uniquely yours into ~/.zshrc.local; drops lines the template will recreate (omz / starship / fzf init, …). Conservative: when unsure, treats a line as yours.接管已有 ~/.zshrc,而不是覆盖。把「只有你才有」的行搬进 ~/.zshrc.local;丢掉模板会重建的行(omz / starship / fzf init …)。判定保守:拿不准一律算「你的」。
# 1) Report only — decide after reading1) 只看报告,读完再决定
$ ./migrate.sh

# 2) Apply (still backs up first)2) 执行(仍然先备份)
$ ./migrate.sh --apply

# 3) Then install as usual3) 再照常安装
$ ./install.sh
theme.sh free
Switch theme / gallery / follow-system. Open source syncs iTerm2 (3 community palettes). Walking the same palette out to Ghostty / Warp / cmux / Tabby / Terminal.app / bat / fzf / eza / delta / tmux / VS Code is paid.换肤 / 画廊 / 跟随系统。开源版只同步 iTerm2(3 套社区配色)。同一份色板走到 Ghostty / Warp / cmux / Tabby / 自带终端 / bat / fzf / eza / delta / tmux / VS Code 属 paid。
Open-source syncs iTerm2. Fuzzy pick with live ANSI preview when fzf is installed:开源版同步 iTerm2。装了 fzf 时可模糊选 + 真彩色预览:
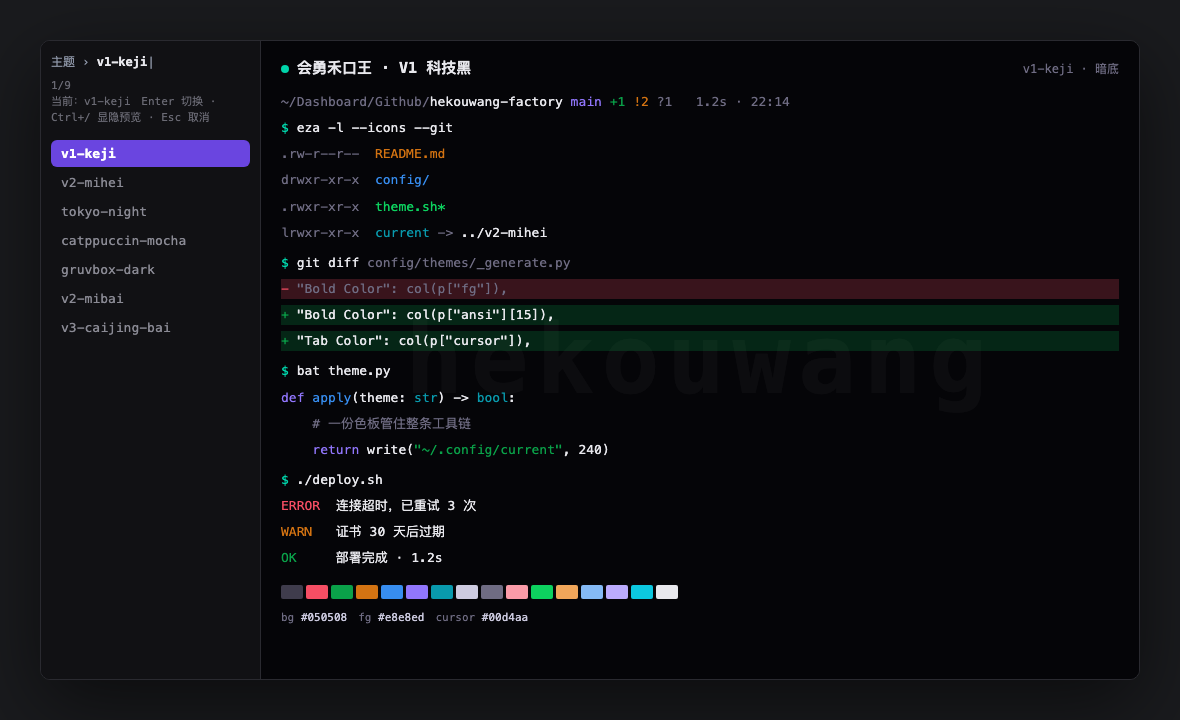
# Fuzzy pick + ANSI preview pane (needs fzf); else gallery有 fzf:模糊选 + 右侧 ANSI 预览;否则画廊
$ ./theme.sh
$ ./theme.sh --pick            # force fzf强制 fzf
$ ./theme.sh --list            # gallery only只要画廊

# Switch (open-source examples)切换(开源版示例)
$ ./theme.sh tokyo-night
$ ./theme.sh catppuccin-mocha
$ ./theme.sh v2-mihei          # brand themes → paid品牌主题 → 付费

# Single-theme / all-theme ANSI preview blocks单套 / 全套 ANSI 整块预览
$ ./theme.sh --preview tokyo-night
$ ./theme.sh --gallery

# Follow system appearance (off by default)跟随系统深浅色(默认关)
$ ./theme.sh --auto
$ ./theme.sh --auto <dark> <light>
$ ./theme.sh --auto off

# After switch: open a new tab for Dynamic Profile rules换肤后:新开 tab,Dynamic Profile 规则才生效
./theme.sh <name> pins that theme and turns --auto off — so a dark pick is not yanked back by system light mode.手动 ./theme.sh <名> 会钉住该主题并关掉 --auto —— 避免配了黑色却被系统浅色顶回白色。
More: Themes & auto · Six terminals · gallery.另见:换肤与跟随 · 六终端 · 画廊。
node-mgr.sh free
Pick exactly one Node manager for the machine. Mixing fnm / nvm / brew node / vfox fights over PATH. Choice lives under ~/.config/hekouwang-terminal/; ~/.zshrc sources only that one.整台机器只留一套 Node 管理器。混用 fnm / nvm / brew node / vfox 会 PATH 打架。选择写在 ~/.config/hekouwang-terminal/;~/.zshrc 只 source 那一份。
$ ./node-mgr.sh              # show current看当前选了哪个
$ ./node-mgr.sh fnm          # recommended default推荐默认
$ ./node-mgr.sh nvm
$ ./node-mgr.sh brew         # single Homebrew node, not a version managerHomebrew 单版本 node,不是版本管理器
$ ./node-mgr.sh vfox
Also set at install time: ./install.sh --node fnm. Guide: Node manager.安装时也能钉:./install.sh --node fnm。指南:Node 管理器。
doctor.sh free
Read-only self-check by default (exit 0 = all green, 1 = has ✗). Section 0 is the state dashboard.默认纯只读体检(退出码 0=全过,1=有 ✗)。第 0 节就是状态机仪表盘。
$ ./doctor.sh                 # full checklist + fix suggestions完整清单 + 修复建议
$ ./doctor.sh --status        # dashboard only: theme / auto / node / optical / scene / semantic / Ghostty reload只看仪表盘:主题 / 跟随 / Node / 光学 / 场景 / 语义 / Ghostty 重载
$ ./doctor.sh --fix           # ask fixes by group: Node / auto / optical / scene / reload / GUI / theme按组问修:Node / 跟随 / 光学 / 场景 / 重载 / GUI / 主题
$ ./doctor.sh --quiet         # one-line verdict (for scripts)只输出结论行(给脚本调)
$ ./doctor.sh --profile       # also zprof the slowest startup pieces顺带 zprof 点名最慢的启动项
Guide: Doctor & uninstall.指南:体检与卸载。
uninstall.sh free
Pair with install. Restores ~/.zshrc from backup; GUI settings go back via defaults delete (real factory defaults). Does not remove Homebrew itself, oh-my-zsh, or your ~/.zshrc.local unless you explicitly opt in.与 install 成对。从备份还原 ~/.zshrc;GUI 用 defaults delete 回真正出厂默认。默认不卸 Homebrew 本体、oh-my-zsh、你的 ~/.zshrc.local(除非你显式勾)。
$ ./uninstall.sh --dry-run    # identical checklist, zero writes清单与真跑相同,一个字节都不动
$ ./uninstall.sh              # interactive; default = kit-owned items only交互式;默认只删本套装的东西
$ ./uninstall.sh --yes        # no prompts; default tier (keeps brew packages & omz)不问;执行默认档(不卸 brew 包、不删 omz)
update.sh free
Pull latest → regenerate themes → redeploy the theme you are on. Does not touch ~/.zshrc.local or GUI tweaks you made yourself.拉更新 → 重新生成主题 → 重新部署当前主题。不碰 ~/.zshrc.local、不碰你自己改过的 GUI。
$ ./update.sh --check         # is there a newer version? what changed?有没有新版本、更了什么?不动文件
$ ./update.sh                 # pull + regenerate + redeploy拉取 + 重生 + 重部署
sync.sh free
Drift check across machines / hand-edits: is what is deployed still what the repo says?多机 / 手改漂移检查:部署出去的配置和仓库里的还一致吗?
$ ./sync.sh                   # read-only drift report只读:哪儿漂了
$ ./sync.sh --pull            # redeploy from repo; pull drift back按仓库重部署,把漂掉的对回来
$ ./sync.sh --export ~/Desktop/kit-pack
                             # bundle whole kit for a second machine打整仓包带到第二台
$ ./sync.sh --state-export ~/Desktop/hkw-state.json
                             # export pinned state only (theme/auto/node/optical/scene/badge)只导出钉住状态
$ ./sync.sh --state-import ~/Desktop/hkw-state.json
                             # restore pins on a new machine新机按 manifest 还原钉住状态
setup-gui.sh free
Writes iTerm2 GUI prefs that must land while iTerm2 is not running (Minimal theme, default profile, Shift+Enter, scrollbar hide, Cmd-click / Semantic History, …). install.sh usually calls this; re-run if doctor section 4 complains.写必须在 iTerm2 退出后才能落盘的 GUI 项(Minimal、默认 Profile、Shift+Enter、藏滚动条、Cmd-click / Semantic History …)。install.sh 通常会调;doctor 第 4 节告警时再补跑。
# Do NOT run this inside a live iTerm2 session — it will skip.不要在正开着的 iTerm2 里跑 —— 会直接跳过。
# A) Quit iTerm2 (Cmd+Q), open macOS Terminal.app, then:A) Cmd+Q 退出 iTerm2,打开「终端」App,再跑:
$ cd /path/to/hekouwang-terminal-kit
$ ./setup-gui.sh

# B) Or from Terminal.app only (never from iTerm2)B) 或只用「终端」App(别从 iTerm2 进)
$ ./doctor.sh                 # re-check section 4 afterwards跑完再看第 4 节
unlock.sh free → paid zip
Open-source entry that installs a paid zip onto this tree (checksum + unpack + regenerate + optional theme apply). No unlock codes — the zip is the paid build.开源仓里的付费包入口:校验 → 解压进本树 → 重生主题 → 可选重新 apply。没有解锁码 —— zip 本身就是付费档。
$ ./unlock.sh ~/Downloads/hekouwang-terminal-kit-付费包-*.zip --dry-run
$ ./unlock.sh ~/Downloads/hekouwang-terminal-kit-付费包-*.zip
$ ./unlock.sh <zip> --no-apply   # unpack + regenerate, skip theme redeploy解压重生,不重部署主题
Buy / pay: landing page · feature map: Paid build.购买:落地页 · 能力对照:付费版。
Paid-only scripts仅付费包里的脚本 paid
These files are not in the public MIT tree. After unlock.sh (or a private clone) you get the engines. Below is the command surface so you know what you are buying — not a copy-paste cookbook of the paid internals.这些文件不在公开 MIT 树里。用 unlock.sh(或 private 仓)装上后才有引擎。下面是命令形态,方便你知道买到什么 —— 不是付费内部实现的可复制菜谱。
font.sh · Optical Calibration Engine终端光学校准引擎
$ ./font.sh
$ ./font.sh status
$ ./font.sh apply maple|operator|victor|jetbrains \
      [--density compact|comfortable|present] [--theme <name>]
scene.sh · Scene Aesthetics Engine场景美学引擎
$ ./scene.sh
$ ./scene.sh status
$ ./scene.sh apply daily|focus|present|record|remote \
      [--theme <name>] [--badge <text>|off]
$ ./scene.sh badge [<text>|off]
workspace.sh · project tab colors项目标签色
$ ./workspace.sh add ~/code/my-project
# After register: cd into the dir → tab color + badge name登记后:cd 进目录 → 标签页变色、右上角印项目名
palette.sh · derive a theme from one accent从一个品牌色推出整套主题
$ ./palette.sh --from '#e08a5f' --name my-theme \
      [--light] [--preset 编辑|科技|数据|默认] [--dry-run]
import.sh · import Ghostty / other theme packs导入 Ghostty 等主题包
$ ./import.sh --list
$ ./import.sh 'Catppuccin Frappe'
$ ./import.sh --all-builtin
Buyer handbook ships inside the paid package (docs/manual.md). Public site stops at “what / why buy”.买家完整手册在付费包内的 docs/manual.md。公开站只写到「是什么 / 为什么买」。
Not a script:不是脚本: Semantic Interaction Layer语义交互层
Ships inside the iTerm2 Dynamic Profile (same path as Triggers). After ./theme.sh …, open a new tab, then Cmd-click path:line / Git SHA / localhost:port.写在 iTerm2 Dynamic Profile 里(与 Triggers 同路)。./theme.sh … 之后新开 tab,再 Cmd-click 路径:行号 / Git SHA / localhost:端口。
Full page: Semantic layer. Status bit: ./doctor.sh --status → semantic.专页:语义交互层。状态位:./doctor.sh --status → semantic。
release.sh is for publishing OSS/pro trees — not an end-user daily tool. Skip unless you maintain the kit.release.sh 是发 OSS/付费树用的,不是日常用户工具。除非你在维护本套件,否则可忽略。